New domain and blog

New domain and blog
Please head over to my new domain to view my blog and current projects

Tuesday, 25 June 2013

My Pursuit of LabVIEW CLD Status

Over the last few weeks I have been honing my LabVIEW programming skills. Not having a full-time job at the moment, very long story, makes this learning easier; I have a lot of time on my hands, but also trickier; I only have the four example exams from the NI website and my imagination to come up with programs to write. My mind also wonders onto Raspberry Pi, TI LaunchPad, running in the forest and various other distractions. 


As can be seen from my last post, I have worked through the four example exams with varying success. I have started round two to get my times down and skills up. So far so good.

I downloaded the example exams quite a while ago but for some reason I found myself back on the CLD e-kit webpage yesterday. Either a new download has recently been added or I just haven't noticed it before, but there is a a download called Preparation: Download Certification Prep Exam Sample Exercises.

This folder is brilliant. Firstly, it gives you a break from writing long, complete programs and secondly, it explains/demonstrates some fundamental processes that can be used in your final programs. The exercises are also only around 45-60min long so great when you don't have much time. 

I worked through 6 today and although I knew most of the principals, it was nice to get a reminder and refresher on some of the basics.

So if you don't have the exercises yet, go and download them and have a look. 

Greg

    Tuesday, 4 June 2013

    LabVIEW CLD Preparation

    I am busy getting ready for my LabVIEW CLD exam so working through the worked examples. I have just completed the first one, The ATM Machine and would really appreciate any feedback that you can provide.


    After looking at the solution, I realised that my version of the solution might have been a bit of overkill, but it works and this is a learning process for me. I will be adding all my solutions here so will try and keep this as clean as possible. If you do decide to comment, please not what solution you are commenting for.
    What I have learnt from the example exams:
    • If you get stuck on a section. leave it, carry on and come back to it later. It’s better to get as many sections completed as possible rather than having one section not working and the rest not done as time ran out. I got stuck on one section for 45min and was just getting frustrated with myself. I eventually got up and left it for a few hours, I know you cant do this in the exam. When I came back to look at it, I solved the problem in 5min, a Boolean constant was false instead of true.
    • Document, document, document. Do documentation as you are writing the code. There might be no time left at the end to get your documentation done and it is a HUGE part of the total mark. I still need to do much better here.
    • A quote that I heard while doing an edX online course. “Comments should describe things that aren't obvious from the code: WHY, not what" John Ousterhout
    • Practice, practice, practice. There are a few tricky areas that I have picked up by doing the example programs. Small/simple things that have taken a lot of time to figure out. Just being aware of these might save you a lot of time.
    • Test your code regularly. The more you test the better the chance of you having a working program to submit. I test my code after every change I make. This might be overkill, but at least I know that I will always have working code with the functionality that I have added.
    • When I redo the example exams next week, I am going to start getting into the habit of backing up my code. I currently use Tortoise SVN to make regular backups but this is not available for the exam. Keep a working copy and backup after you finish a section.
    • Use breakpoints, extra indicators and the probe tool to debug. Sometimes a simple problem that can a long time to figure out, but this time can be drastically reduced by using the tools available.
    ------------------------------------------------------------------------------------------------------------
    ATM Machine 1:
    Here are some questions that I have:
    • Is it necessary to provide HTML help files for every VI? Takes quite a bit of time which could be used elsewhere.
    • For the exam, do you need to make an executable to provide with the solution?
    • I know my 'Enter Pressed' case in the MHL needs some work. 
    • Is there a way to update a single element in the Accounts.txt file or do you need to rewrite the whole file?
    You can find my post on the NI Forums here.
    Or you can get a copy of the code here.
    ------------------------------------------------------------------------------------------------------------
    Boiler Controller 1:
    I have just finished the Boiler Controller example. This took me around 5 hours so I’m getting quicker. Need to practice some common VI’s that I use so that I can get those done quickly. I found the question not as clear as the ATM Machine but I think I got there.
    Some questions again:
    • The Stop button; is that just to stop the application because the shutdown button just restarts the application.
    • I ended up using quite a few local variables but not sure if that’s OK. Is there another way to do things. The main place I used them was for the start and shutdown process to remember the button states and valve position value.
    • My Time Count only counts in seconds. Is it necessary to count in milliseconds?
    • Is it necessary to disable any controls or indicators during certain steps? As far as I can see it doesn’t say so.
    You can get a copy of the code here.
    ------------------------------------------------------------------------------------------------------------
    Car Wash 1:
    This exam was by far the trickiest so far. Once I managed to get my head around the timing system, then the rest of the program just fell into place. I started yesterday and finished it this morning for a total time of around just over 5 hours. Practice is still needed but I am slowly starting to used to some concepts which I will study and hope to be able to use in the CLD exam.
    Only one questions this time:
    • Is it better to update the display in an Update Display case or each time outside the case but inside the While loop like I did in this program? I found it easier to do it this way.
    You can get a copy of the code here.
    ------------------------------------------------------------------------------------------------------------
    Sprinkler System 1:
    I finished the Sprinkler system in just over 4 hours which included being stuck on one part for over an 45min. Out of the four examples, I feel this one was the easiest to complete. I am not sure if is because of the practice that I have been having, or because it is the easiest question. I feel that I am getting there which is good.
    Next is to practice some common components that I can build quickly to save time, like the timing engine and getting the front panel built as quick as possible.
    You can get a copy of the code here.
    ------------------------------------------------------------------------------------------------------------
    Thanks in advance for all your advice.

    Greg

    Sunday, 2 June 2013

    Raspberry Pi: MCP23008 Port Expander

    I have been wanting to get an MCP23008 I2C port expander connected to my Raspberry Pi for quite a while. I finally got one and during my breaks from LabVIEW CLD exam preparation, made the circuit on some strip board. 


    Using the Quick2Wire Python I2C library makes getting this working really quick and easy. Just make sure you place your LED's the correct way around. I spent a bit of time debugging the I2C until I thought of checking the obvious. 

    Currently I only have the outputs working as I didn't have any switches with me. I'll add two switches and get that going next. 

    Here is the code that I used. I set up a little menu to select which LED to turn on or off. 


    Next I plan to get the software PWM working so that I can connect up to Cheerlights. Need to do some more studying and then will get that going. Also need some RGB LED's first.

    Until next time, happy coding.

    Greg

    Monday, 20 May 2013

    A week of LabVIEW courses at National Instruments

    Last week I sat my first two LabVIEW courses. I have been wanting to do some courses for a long time but have never really had the opportunity. Fortunately as I am not working at the moment, I got the time to do them. As I did my CLAD exam a few months ago, I decided to to LabVIEW Core 3 and LabVIEW Connectivity.


    LabVIEW Core 3 was on Monday to Wednesday and then LabVIEW Connectivity was on Thursday and Friday. The week was really packed in, but the amount of hands-on time kept us busy and focused.

    Over all I got more out of Core 3 and will definitely be using many of the concepts in my future programs. I have also thought back to some of my first programs and realised that I could have made them so much better in many ways. I am planning on doing my CLD exam around August so will be going over many of the topics in my practice programs. 

    I found Connectivity a more fun course where we learnt how to use many network tools and tools to include shared libraries from .net and many other programming languages.

    The examples that you work through for both courses are very in depth and explain the concept being taught very well. The instructors that lead the course are very knowledgeable and helpful about the course subject  and other questions and topics that arise during the discussion periods. 

    I highly recommend taking one or many courses that NI offer as this is a great way to learn quickly. The learning curve that I went through a few years ago when I learnt LabVIEW by myself would have been drastically shortened had I done some courses sooner. 

    Go on, give your NI representative a call and book a course today. You will not regret it one bit.

    Greg

    Wednesday, 24 April 2013

    Raspberry Pi temperature profile using LabVIEW

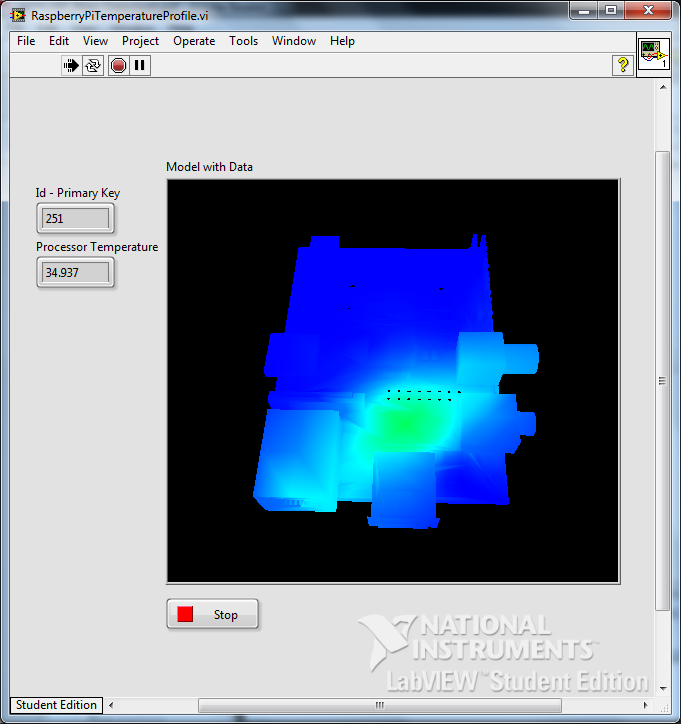
    Connected to my Raspberry Pi is a DS18B20 temperature sensor which I have mounted inside the case roughly above the processor. I wanted to map the temperature profile inside the case and have a visual representation of it. To do this I joined up a Python script, an SQLite3 database and LabVIEW.


    I only have one temperature sensor connected and the RasPi doesn't run very warm so this image is rather exaggerated. I'll explain a bit more later.

    So I started off by writing a Python script that runs on my RasPi. It measures the temperature and then logs it to a SQLite3 database that I store in a shared folder on a mounted USB flash drive. I have accelerometer data in the database too, but that will be added a bit later.


    That is all that happens on the RasPi. Next I wrote a LabVIEW program that queries the database over the network to get all the data. I need to do a bit of work on my query to just return the last line of data but that I'll add in future versions.

    To query the SQLite3 database, I used the this toolkit which works really well and is super simple to get set up. Once I have the temperature, I need to display it on in user interface. This is where Sensor Mapping Express VI comes in really handy.


    All you need to do is point to your .stl file and select where you want to the temperature sensors to sit on the RasPi. I used this model which I converted using Google SketchUp. This is where I had to use four dummy senors to be able to show the temperature difference. I have set the outside 4 sensors to 0 degrees Celsius and only sensor 0 is getting the temperature from the database. With more sensors this can be made a lot more accurate. As I said earlier, this is just to prove a concept for now.

    Every 100ms I query the database, build an array with the temperature data and then apply it to the Sensor Mapping Express VI. The temperature profile then changes according to the surface temperature of the RasPi.

    Here are the colours that I used for my mapping:

    Temperature vs Colour mapping:
    0 Celsius R-0 G-0 B-255
    21.25 Celsius R-0 G-255 B-255
    42.5 Celsius R-0 G-255 B-0
    63.75 Celsius R-255 G-255 B-0
    85 Celsius R-255 G-0 B-0

    I have already connected up an ADXL345 accelerometer which is acquiring tilt and pitch values, so my next step is to be able to move the  model in LabVIEW as I move my physical RasPi. Should be some fun for a few more hours.

    If you want a copy of my code, you can grab it over here.

    Please feel free to leave any tips, comments or questions below.

    Greg

    Monday, 22 April 2013

    Route static files for BottlePy web framework

    I have been using BottlePy on my Raspberry Pi for quite some time. I really like the simplicity of the framework and the ease at which you can get something up and running. The one issue I had, was that you could not load static css or js files. 

    There are ways around this, like placing your files in Gist and linking to the raw code, but this can be an issue when you want to run your webserver 'offline'. The documentation is not very clear on how to do this, so here is what I did to get it working properly. 

    This is the template that I use to route the static files. This is part of my main python code that runs the server.

    Then all you need to do is add your file names in the .tpl file. By doing this, your css, or js files can be stored locally so they can still be served if you are offline. 

    That is about it. I hope this helps because I really find this framework great to use and works flawlessly on my Raspberry Pi.

    Greg

    Source Control for LabVIEW using TortoiseSVN

    For a long time now I have been using LabVIEW, but I am not very diligent at using source control. Source control is one of those things that you never really need until it's too late. So this weekend I decided to install TortoiseSVN on my laptop to start out small, but get into the habit of backing up and recording the changes I make to my code. 

    To get up and running is rather easy. Go over to TortoiseSVN and download the install file. Once installed, you are ready to get going. 

    The first thing to do is make a folder somewhere to store your repository. I called mine svn_repos. Now right click, you will see an option for TortoiseSVN. Select the Create repository here option from the drop down menu. 


    Once you have created the repository, go over to the folder that you want to back up. Right click on the folder and select the import option under the TortoiseSVN menu. A window will pop up where you need to enter the path and details of the change. My folder name is TemperatureLogger so just change that in the path to suit your folder.


    Press OK and all the files in that folder will be backed up.

    Now you need to get a  working copy. I use the same folder but you can select any folder for your working copy. Right click on the folder that you have just imported and select the SVN Checkout option. Select your path and if it is the same path you will get a warning. Click OK and when the checkout is complete, you will notice that there is a green tick icon over the folder. When you make any changes to the files, that green icon will turn red.

    The LabVIEW part is to now install the JKI Toolkit for TortoiseSVN. Firstly you need to install the VI Package Manager. Once installed, search for TortoiseSVN in the user interface and install it. This takes a couple of minutes and needs your input for a few of the steps.

    Once everything is installed, open one of the files that you previously imported and checked out in LabVIEW. Make any change and then save it. You will now notice that there is a red icon over the files that have been changed. 


    In LabVIEW, go to tools > TortoiseSVN > commit. 


    Here you will be given the option to add a comment for the changes that were made. This helps you track your changes over time.


    You will now notice that icons over the files are back to green letting you know that you have backed up all your files.


    You can also get these options directly from Windows Explorer, but it is really convenient to have the option to back up your work directly from LabVIEW. There are many more tools to be used and they are explained pretty well in the documentation.

    Well I hope this helps you start to back up and document the changes that are made to your programs. Please don't forget that this can be used for any type of files, not just in LabVIEW. All you need to do is right click on the file or folder and choose the option under the TortoiseSVN menu.

    Greg

    Tuesday, 16 April 2013

    Raspberry Pi: Direct connection to Windows 7

    This is something I have been wanting to try for quite some time but never really found much info on how to do it. Well I sat down the other day to get it done and realised that it is MUCH easier than I expected.

    My objective is to directly connect my Raspberry Pi to my laptop using an ethernet cable. In the next few months I am going to be away from a decent internet connection but I still wanted to do some work on my RasPi. So my Google searching started, finished and here is what to do.

    The process uses a built-in feature of Windows 7 called Internet Connection Sharing (ICS). In a nutshell, you can use any Windows computer with more than one network connection, WiFi and LAN, and share the connection to other computers. 

    Firstly you need to set up the settings on Windows. You need to go to the properties of your disconnected LAN connection and click on the sharing tab. Then check the box to allow other network users to connect through this internet connection.


    The tricky thing to set up is the IP address that you are going to give the RasPi. You need to check the TCP/IPv4 settings under the Networking Tab. I picked an IP address and gave my RasPi a static address so that I know what it is when ever I use this connection.

    Next you need to power up your Raspberry Pi and connect to it some way. Either use a WiFi connection that is already set up, an ethernet connection to your router or using the serial port on the GPIO.

    You then need to set up the IP address by editing the interfaces file.
    sudo nano /etc/network/interfaces
    Change the part of the file that refers to your eth0 connection to look similar to below. You might have other settings in there like WiFi IP addresses and passwords but just leave those alone.
    iface eth0 inet static 
    address 192.168.137.184 
    netmask 255.255.255.0

    Once you have saved the interfaces file, send the shutdown command so that you can change over the connections. Once powered off, directly connect your RasPi ethernet port to your Windows ethernet port. You should be able to use both straight-through and cross-over cables. Now power up the RasPi.

    Once booted up, you should be able to log in with Putty to the static IP address that you set above. 

    And that is pretty much it. Another cool thing by connecting this way is that you should be able to power your Raspberry Pi from your computer USB port. This makes transport really easy as all you need is an ethernet cable and a USB cable to get up and running. 

    Hope this helps and if you have comments or questions, please leave them below and I'll get back to you as soon as I can.

    Greg

    Monday, 18 March 2013

    Suspension Training workout

    I got a rip:60 suspension trainer for Christmas last year and have been using it on and off for the last few months. I started out doing the videos, but after a few weeks I hurt my knee running so took a few weeks off. 

    Three weeks ago I started again, but this time with my own program. I used the wall chart that comes with the package and just picked a few moves that I wanted to do. I stayed away from squats and exercises that put too much pressure on my knees so concentrated mainly on upper body moves. 

    Here is my routine that I have done five days a week for the last four weeks. I can already see results and will change it up next week.

    Do a 10 - 15min warm up before completing any exercise.

    10 reps each leg Alternating Lunge with Rear Delt Fly


    15 reps Fly


    10 reps Lat Pull Down


    2 sets of 60 sec Plank using suspension trainer to support your feet

    10 reps Tricep Extension with Roll Out


    10 reps Bicep Curl


    15 reps Plank with crunch to Push Up


    30 sec Plank using suspension trainer to support your feet

    2 sets of 60 sec Reverse Plank with Abduction


    15 reps Push Ups


    10 reps Hammer Curl


    10 reps each side Plank with Oblique Crunch


    Repeat from top once more

    Balance on each leg for 30 sec with closed eyes

    Stretch and cool down

    That should take about 45 min so in total with warm up and cool down should be about 60 min.

    Greg

    Saturday, 16 March 2013

    LabVIEW: CLAD certified

    I have been working with National Instruments' LabVIEW software and hardware for about 3 years now. Unfortunately I have not been able to do any courses or qualifications through the companies I have worked for so I just learnt and taught myself as I went along.

    All that changed after I moved to the UK. I went to a NI symposium and they offered a Certified LabVIEW Associate Developer (CLAD) exam at the end of the symposium for all those that wanted to take it. 

    I decided to go for it and make the most of the opportunity given to me. I thought it went well and was quite confident when I left the exam. However, from my experience, that doesn't always mean a good thing.

    Well this morning, after waiting a few weeks, I got an email from NI with my CLAD certificate. I passed and am now CLAD certified. 


    I have been waiting a long time to get this certification and finally have it.

    Thank you to NI who offer such an exam to those willing to work for it and stay after the symposium has ended.

    Greg